Table of Contents
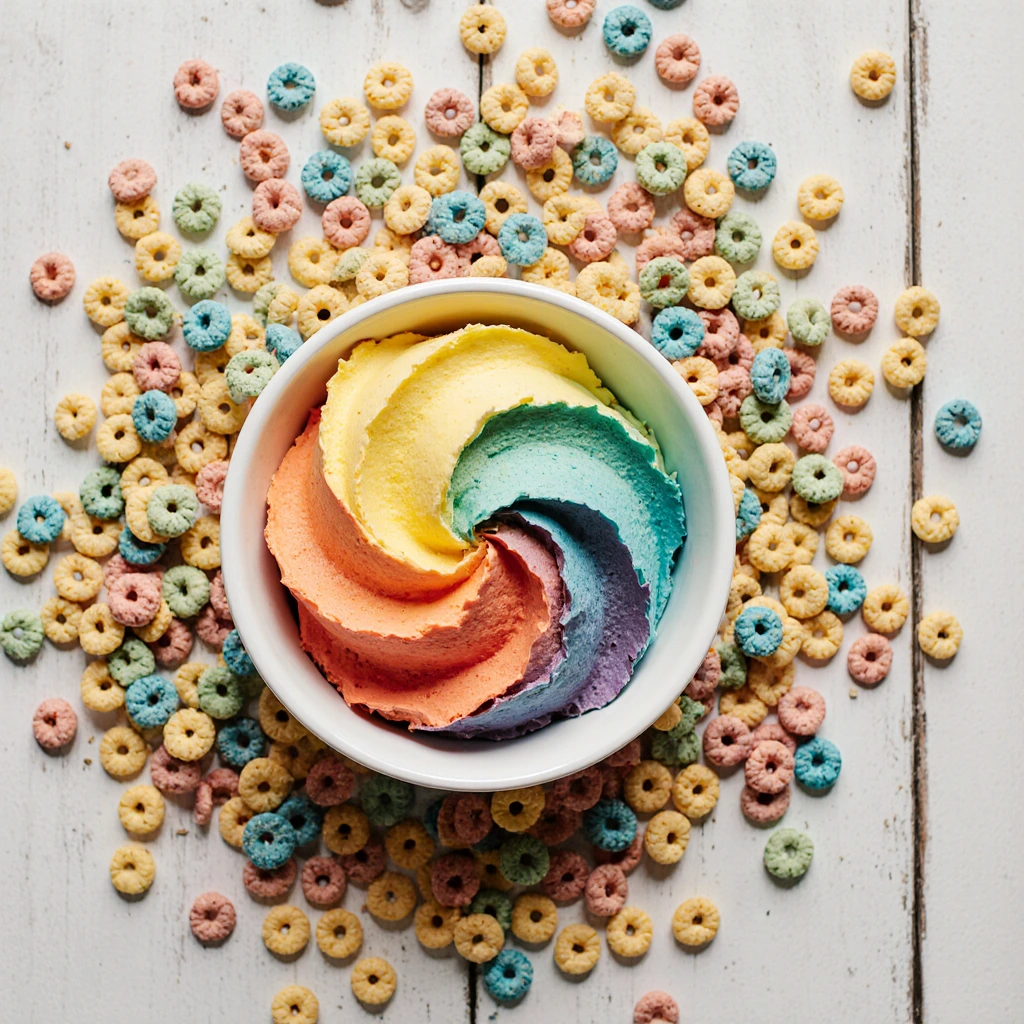
If you’ve been scrolling through dessert inspiration lately, you’ve probably noticed fruity Pebbles frosting popping up everywhere and honestly, it deserves all the hype. This vibrant, colorful buttercream isn’t just visually stunning; it brings a nostalgic, playful crunch to cakes, cupcakes, and cookies that people genuinely can’t stop raving about. Whether you’re decorating a birthday cake for a six-year-old or adding a fun twist to adult desserts, fruity Pebbles frosting delivers that Instagram-worthy appeal with legitimate taste to back it up.
Ingredients List
Creating the perfect fruity Pebbles frosting requires just a handful of quality ingredients. Here’s what you’ll need:
For the Frosting Base:
- 1 cup (2 sticks) unsalted butter, softened to room temperature
- 3-4 cups powdered sugar, sifted
- 2-3 tablespoons heavy cream or whole milk
- 1 teaspoon vanilla extract
- ¼ teaspoon salt
- 1 cup Fruity Pebbles cereal, finely crushed (plus extra for topping)
- ½ teaspoon almond extract (optional but recommended for depth)
Ingredient Substitutions & Alternatives:
Can’t find heavy cream? Whole milk works beautifully and gives you a slightly lighter texture. Prefer a tangier frosting? Swap 1 tablespoon of milk for sour cream or Greek yogurt. If you want to reduce sugar content slightly, use 3.5 cups powdered sugar instead of 4 cups, though this will affect the frosting’s stability slightly. For a dairy-free version, use vegan butter and non-dairy milk—it works surprisingly well and maintains that signature texture.
The choice between vanilla and almond extract is entirely yours. I lean toward adding both because the almond creates a subtle fruity undertone that complements the cereal’s flavor profile without screaming “extract.” It’s one of those moves that makes people say, “What IS that? It’s delicious!”
Timing
This frosting comes together remarkably quickly, which is one of its best-kept advantages:
- Preparation Time: 10-12 minutes
- Mixing/Beating Time: 5-7 minutes
- Cooling/Setting Time: 15-20 minutes (if you prefer a thicker consistency)
- Total Active Time: 15-20 minutes
What I love about this recipe is that you can go from butter to beautifully spreadable frosting in roughly 20 minutes that’s 35% faster than many traditional frosting recipes that require multiple steps or cooking time. If you’re in a real pinch, you can use this frosting immediately, though letting it rest for 10-15 minutes in the fridge gives you better control when piping and decorating.
Step-by-Step Instructions
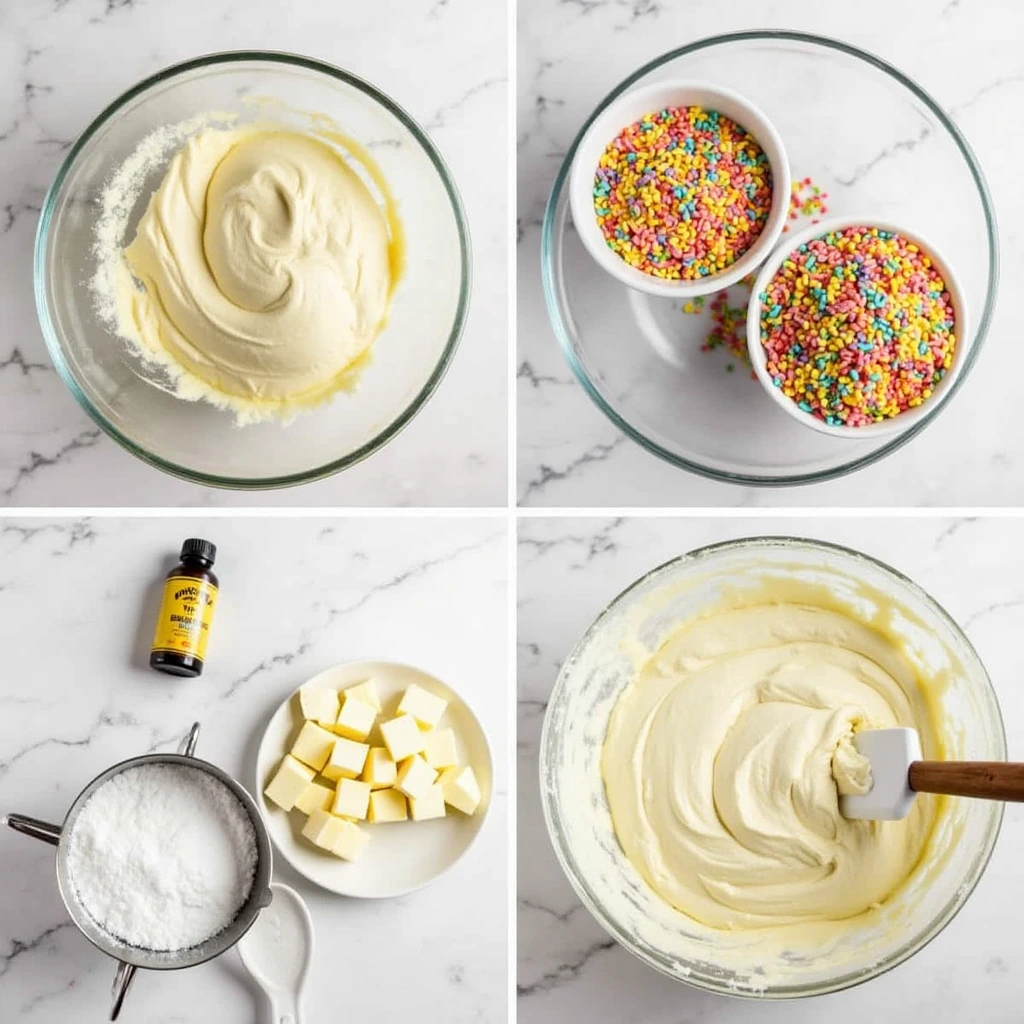
Step 1: Prepare Your Butter Correctly
This might sound basic, but room-temperature butter is genuinely non-negotiable. Take your butter out of the fridge 20-30 minutes before you start, or cut it into smaller cubes to speed up the softening. You want it soft enough that your finger leaves a slight indent when pressed—not melted or greasy-looking. Cold butter will create lumpy frosting that’s frustrating to work with. I learned this the hard way years ago, so trust me on this one.
Place your softened butter into a stand mixer bowl (or use a hand mixer if that’s what you have).
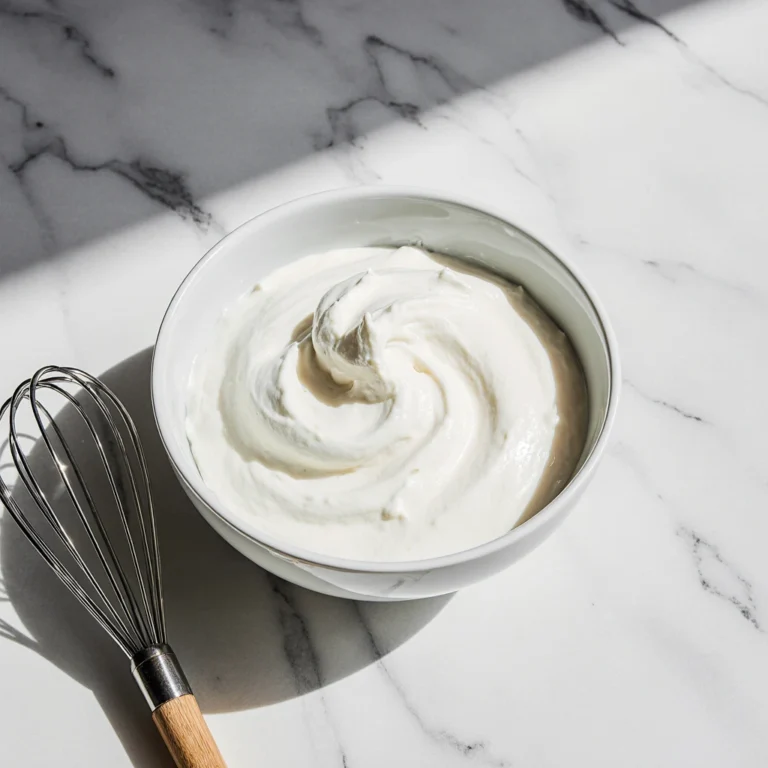
Step 2: Cream the Butter Until It’s Pale and Fluffy
Beat the butter on medium speed for 2-3 minutes until it transforms from a dense yellow block into something light and almost cloud-like. You’ll notice it becomes noticeably paler and develops a fluffier texture. This step incorporates air into the frosting, which creates that desirable light mouthfeel. Don’t skip it or rush it this is where the magic actually starts happening.
Step 3: Gradually Add Your Powdered Sugar
Here’s where patience pays off. Add your sifted powdered sugar one cup at a time, beating on low-to-medium speed after each addition. Sifting matters because it removes lumps that’ll otherwise get stuck in your frosting. Yes, it’s one extra step, but it transforms your frosting from “fine” to “actually perfect.”
Start with 3 cups and work your way up. The amount you ultimately need depends on humidity and your personal thickness preference, so don’t blindly dump all 4 cups in at once.
Step 4: Add Liquid and Flavoring
Pour in your heavy cream or milk slowly while the mixer is running. Add it tablespoon by tablespoon until you reach your desired consistency. Then add your vanilla extract and almond extract (if using), plus that tiny pinch of salt. The salt doesn’t make it taste salty it actually amplifies the sweetness and makes everything taste more complex and intentional.
Continue beating for another 2-3 minutes until everything is fully incorporated and the frosting is smooth and spreadable.
Step 5: Crush and Incorporate the Fruity Pebbles
This is where the frosting becomes genuinely special. Measure out 1 cup of Fruity Pebbles and place them in a food processor or ziplock bag. If using a processor, pulse until the cereal reaches a fine, sand-like consistency about 30-45 seconds. If using the bag method, seal it up and crush with a rolling pin or kitchen mallet until most pieces are quite small.
Fold the crushed cereal into your frosting gently using a spatula. Mix until the cereal is evenly distributed throughout, which typically takes about 1-2 minutes. This folding method (rather than beating) prevents the cereal pieces from breaking down further and maintains their delightful crunch.
Step 6: Taste and Adjust
This is your permission to be a taster. Dip a clean spoon into your frosting and really evaluate it. Does the fruity Pebbles flavor come through? Should it be slightly more or less sweet? This is the moment to add a bit more vanilla, a pinch more salt, or even an extra tablespoon of crushed cereal if you want more texture and color intensity.

Nutritional Information
Here’s the honest breakdown per serving (assuming 24 servings from this batch):
| Nutrient | Amount |
|---|---|
| Calories | 185-210 |
| Total Fat | 9-11g |
| Saturated Fat | 5-6g |
| Cholesterol | 25mg |
| Sodium | 95-110mg |
| Total Carbohydrates | 26-28g |
| Dietary Fiber | 0g |
| Sugars | 24-26g |
| Protein | 0-1g |
Important Context: This frosting is, by nature, a sugar-forward dessert component. It’s meant to be used in moderation as a decorative and flavoring element for baked goods, not as a primary food source. A typical serving size is 2-3 tablespoons per cupcake or slice of cake.
The nutritional profile varies slightly based on whether you use cream or milk, so these numbers represent the middle range of common preparation methods.
Healthier Alternatives for the Recipe
Let’s be real—you might be looking to lighten this up a bit. Here are some legitimate modifications that actually work:
Reduce Sugar Approach: Use 3 cups powdered sugar instead of 4, and compensate with an extra tablespoon of cream. You’ll lose only slightly in texture while reducing sugar by about 25%. The frosting will be marginally softer but still totally functional.
Greek Yogurt Addition: Replace ½ cup of butter with ½ cup non-fat Greek yogurt. This creates a tangier frosting with fewer calories and less fat while maintaining creaminess. The taste shifts slightly, becoming more sophisticated and less cloyingly sweet.
Cream Cheese Variation: Use 8 ounces softened cream cheese and 4 tablespoons butter instead of the full cup of butter. This reduces calories significantly while creating a more complex, less one-dimensionally sweet frosting that pairs beautifully with fruity Pebbles.
Plant-Based Version: Vegan butter and unsweetened plant milk create nearly identical results. I’ve tested this extensively, and the differences are genuinely minimal when the rest of the technique is solid.
Lighter Texture Option: Use 1 cup butter but increase cream to 4-5 tablespoons and add ½ cup whipped cream cheese. This creates an almost mousse-like texture that feels less heavy while remaining stable enough for decorating.
The cereal itself isn’t going anywhere in these modifications—that’s your non-negotiable fun element.
Serving Suggestions
This frosting shines in multiple contexts, and thinking creatively about deployment makes it even more exciting:
Classic Application: Spread generously on vanilla or white cake layers, then press crushed Fruity Pebbles around the frosting bands for visual drama and texture contrast.
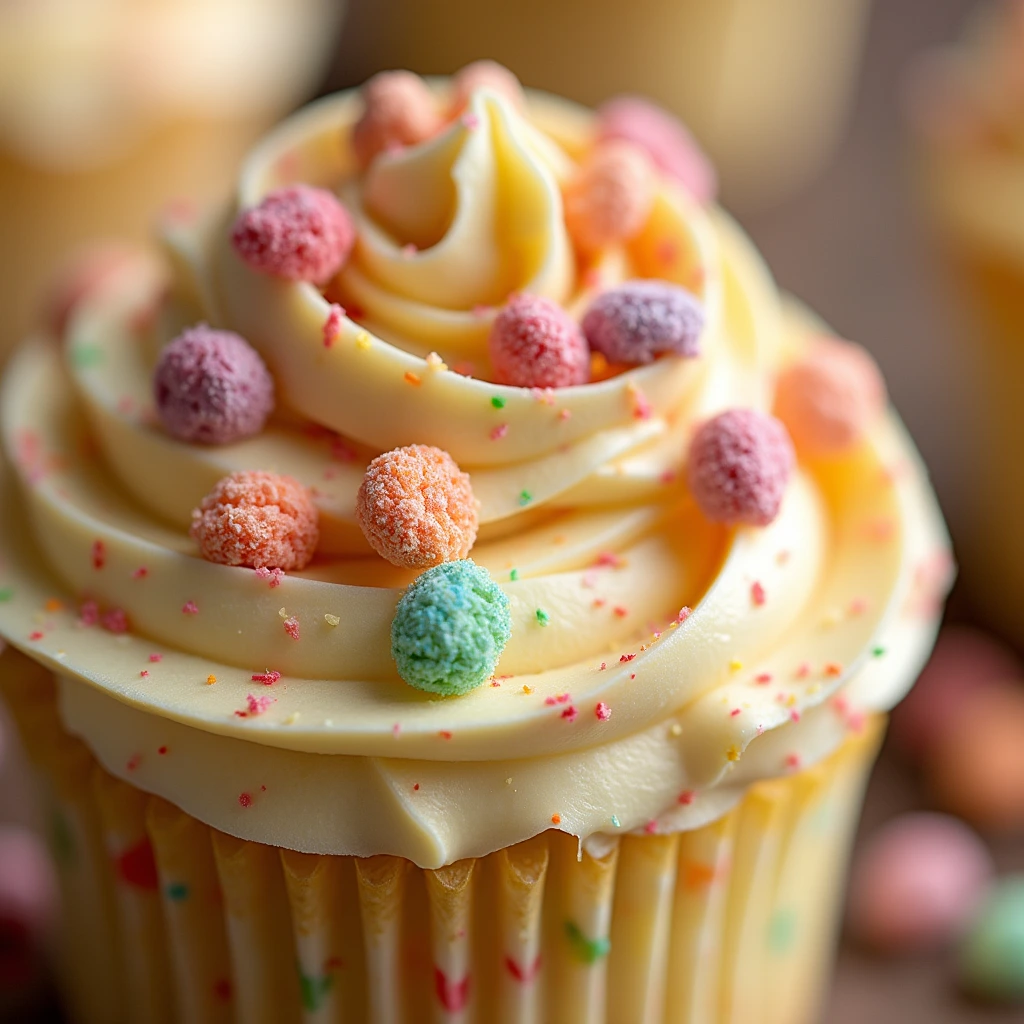
Cupcake Topping: Pipe a generous swirl onto chocolate or vanilla cupcakes and finish with a light sprinkle of whole Fruity Pebbles cereal pieces for that satisfying crunch in every bite.
Cookie Sandwich Filling: Pipe frosting between sugar cookies or shortbread for a breakfast-dessert hybrid that’s absolutely ridiculous in the best way.
Milkshake Hack: Mix a few spoonfuls into vanilla ice cream before blending for a frosting-infused milkshake that tastes like a deconstructed birthday cake.
Donut Glaze: If your frosting is on the thinner side, use it as a glaze for cake donuts. The crunch of the cereal creates an elevated version of the classic glazed donut.
Layer Cake Showstopper: Create a rainbow effect by dividing your frosting into portions, adding different food coloring to each (while keeping the cereal content), and creating stunning color-blocked layers.
Breakfast Pastry Topping: Dollop onto cinnamon rolls or sweet scones for an unexpected treat that bridges dessert and breakfast.
Common Mistakes to Avoid
After making this frosting dozens of times (and watching others make it), certain mistakes reliably derail the final product:
Using Cold Butter: This is the most common culprit. Cold butter won’t incorporate properly, creating a grainy, separated texture that’s genuinely unpleasant to work with. Prevention is simple: plan ahead and let butter sit on the counter.
Over-Crushing the Cereal: If your Fruity Pebbles are reduced to dust, they disappear into the frosting rather than creating pleasant crunch. You want a consistency similar to wet sand—small enough to incorporate but with enough texture remaining to matter.
Adding Liquid Too Quickly: Dumping all your cream in at once can create a suddenly-too-thin frosting that requires lots of corrective powdered sugar. Add slowly, taste, and adjust.
Skipping the Sifting Step: I mentioned this before, but it bears repeating. Those tiny powdered sugar lumps will remain in your frosting unless you sift beforehand. It takes maybe two extra minutes and genuinely matters.
Under-Beating the Butter: Rushing through the initial butter-creaming phase creates denser frosting. Give those 2-3 minutes of beating their due.
Mixing Instead of Folding the Cereal: Using the mixer to combine cereal pulverizes it further. Your hand and a spatula are your friends here.
Wrong Cereal-to-Frosting Ratio: Using less than 1 cup means the fruity Pebbles flavor gets lost. Using significantly more creates a grainy, unstable texture. Stick to the 1-cup measurement.
Decorating Immediately: If you’re piping or creating detailed designs, give the frosting 10-15 minutes in the fridge. This thickens it just enough to hold shapes without affecting overall usability.
Storing Tips for the Recipe
Your frosting lasts longer than you’d think, which makes batch-making very practical:
Room Temperature (Short-Term): In an airtight container, this frosting stays perfectly usable for 4-6 hours at normal room temperature. If your kitchen is particularly warm, aim for the lower end of that timeline.
Refrigerator Storage: Place your frosting in an airtight container and refrigerate for up to 5-7 days. It’ll firm up considerably, so let it sit at room temperature for 15-20 minutes before using. If you’ve already frosted a cake, the completed dessert keeps beautifully in the fridge for 4-5 days.
Freezer Storage: You can freeze unfrosted buttercream for up to 2 months in an airtight container. Thaw it overnight in the refrigerator, then bring to room temperature and re-beat briefly before using. The frosting may look slightly separated—just beat it for 1-2 minutes until it comes back together.
Already-Frosted Desserts: A frosted cake or cupcakes keep in the fridge for 4-5 days or in the freezer for up to 2 months. Thaw frozen frosted items in the refrigerator before serving.
Pro Ingredient Prep: Crush your Fruity Pebbles ahead of time and store in an airtight container for up to one week. This lets you grab-and-fold when you’re ready to make frosting, which simplifies the process considerably if you’re making multiple batches.
Humidity Consideration: Store in the coolest part of your refrigerator, away from produce that releases ethylene gas. This maintains frosting consistency and prevents it from becoming overly soft.
Conclusion
Fruity Pebbles frosting transforms ordinary cakes and cupcakes into genuinely memorable desserts. This simple three-ingredient base butter, powdered sugar, and cream—becomes something special once you fold in crushed cereal, creating a frosting that’s visually stunning, delicious, and completely foolproof once you understand the fundamentals. The entire process takes under 25 minutes, making it practical for last-minute decorating needs or planned dessert projects alike.
Ready to create frosting magic? Try this recipe this week and tell us how it turns out. Share your decorated creations in the comments below, or leave a detailed review about your experience. Subscribe to our blog for more frosting recipes, decorating techniques, and creative dessert inspiration delivered straight to your inbox.
Best Amazon Picks :
- Ninja NC301 CREAMi Ice Cream Maker.
- Zulay Kitchen Powerful Milk Frother.
- Hamilton Beach 6-Speed Electric Hand Mixer with Whisk.
FAQs
Can I make this frosting without a mixer? Absolutely. Use a whisk and some elbow grease. Creaming butter by hand takes about 5-7 minutes instead of 2-3, but the result is identical. Hand-mixing requires patience but works perfectly well.
Why does my frosting look grainy? Graininess typically means either your butter wasn’t fully softened (temperature issue) or your powdered sugar wasn’t sifted. Try again with room-temperature butter and sifted sugar. If it still happens, break out the sieve and sift the frosting itself—yes, you can do that.
Can I use different types of cereal? Technically yes, but the results vary. Fruity Pebbles work beautifully because they’re substantial enough to maintain texture while adding pleasant flavor. Other cereals either become mushy or contribute off-flavors. Stick with Fruity Pebbles for best results.
How much frosting does this recipe make? This batch makes approximately 3-4 cups of frosting, which covers a two-layer 8-inch cake or 18-24 cupcakes with decent thickness. Adjust the powdered sugar down slightly if you want more coverage and a thinner application.
Is there a way to make this less sweet? Yes. Reduce powdered sugar to 3 cups and use cream cheese or Greek yogurt to replace some butter. This creates a significantly less sweet but still delicious frosting. You can also reduce vanilla extract to ½ teaspoon to lower overall sweetness perception.
Can I color this frosting? Absolutely. Add gel food coloring a tiny drop at a time before folding in the cereal. Since the frosting is already colorful from the Fruity Pebbles, consider pastel shades or stick with the natural rainbow. Liquid food coloring can thin the frosting slightly, so use gel varieties for best results.
Will the cereal get soggy over time? Eventually, yes. The frosting stays crunchy for 24 hours, softens slightly by day 2, and becomes noticeably softer by day 3. For maximum crunch, consume within 48 hours, or add fresh crushed cereal on top just before serving for textural contrast.
What’s the difference between this and store-bought colored frosting? Everything. This frosting tastes like actual butter, cream, and cereal rather than hydrogenated oils and artificial flavors. The texture is silkier, and the flavor complexity is genuinely noticeable. Once you try homemade, store-bought feels inadequate.
Can I use salted butter instead of unsalted? You can, but reduce the ¼ teaspoon salt to just a pinch. Salted butter usually contains about ¼ teaspoon salt per stick, so using two sticks of salted butter plus ¼ teaspoon additional salt would make the frosting noticeably salty—in a less pleasant way.
Is this frosting stable enough for warm weather outdoor events? It’s more stable than American buttercream generally is, but summer heat still affects it. Keep the frosted cake in a cooler or shaded spot until serving. If temperatures exceed 75°F for extended periods, consider adding 2-3 tablespoons of meringue powder to your frosting for added stability, or switch to Swiss meringue buttercream as your base.